Mastering the Mess: Crafting a DIY Flat File System for Organized Sandpaper Grits
In any well-equipped workshop, the humble sheet of sandpaper is an indispensable tool, yet its organization often remains an afterthought. The familiar scenario of rummaging through a crumpled pile of various grits, struggling to identify the correct abrasive, is a common frustration. This disarray not only wastes precious time but can also lead to premature wear of the sandpaper itself. The solution lies in a dedicated storage system designed for both accessibility and preservation: the DIY flat file for sandpaper.
The Imperative of Organized Abrasives
Effective workshop management hinges on efficient access to tools and materials. For sandpaper, this means keeping sheets flat, protected from dust and moisture, and—critically—separated by their respective grit sizes. A disorganized stash can lead to:
- Time Loss: Searching for the right grit disrupts workflow.
- Material Degradation: Creased or exposed sandpaper can lose its abrasive qualities faster.
- Project Delays: Inconsistent grit selection can compromise finish quality, leading to rework.
A purpose-built flat file system addresses these challenges directly, transforming a chaotic pile into an organized inventory.
Designing Your Grit Stash: The Flat File Approach
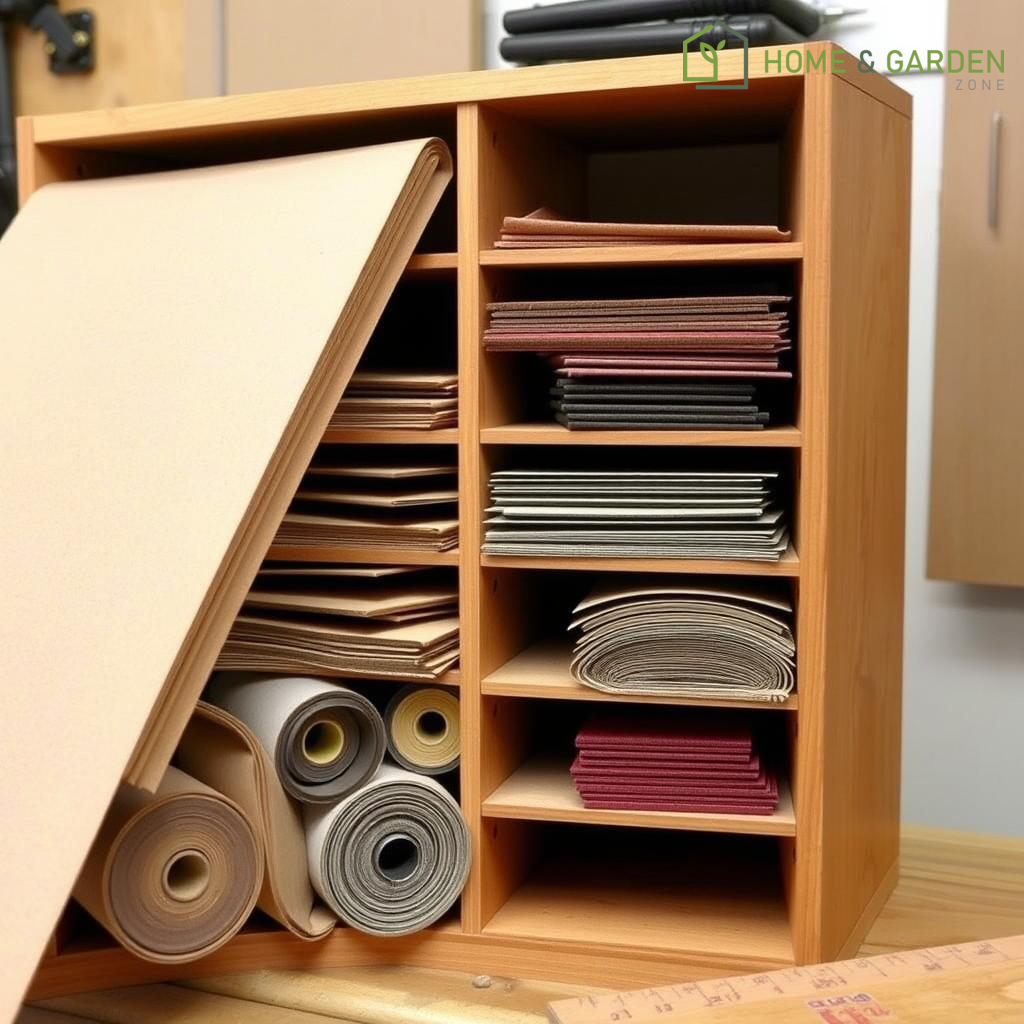
The concept of a flat file for sandpaper borrows from architectural and artistic storage solutions, where large, delicate documents are kept flat in shallow drawers or compartments. For sandpaper, this translates into a compact unit—often constructed from readily available materials like plywood, MDF, or even durable cardboard—that provides individual slots or shallow trays for each grit. The primary goal is to ensure each sheet remains perfectly flat, preventing the curling and bending that can degrade its efficacy.
Key Design Considerations:
- Material Durability: Plywood or MDF offers robustness and ease of construction, ensuring the unit withstands workshop conditions.
- Compartment Sizing: Design compartments slightly larger than standard sandpaper sheets (e.g., 9x11 inches or specific sizes for sanding discs) to allow for easy insertion and retrieval.
- Visibility and Labeling: Clear labeling for each grit (e.g., 60, 80, 120, 220, 320) is paramount. This can be achieved with adhesive labels, stencils, or even color-coding.
- Accessibility: Whether a series of pull-out trays, vertical dividers within an open box, or a flip-down front, the design should prioritize easy access without disturbing other grits.
- Dust Protection: A closed or semi-closed design helps protect sandpaper from abrasive dust, which can contaminate finer grits or clog the paper.
Implementing Your Storage Solution
Creating a DIY sandpaper flat file can range from a simple box with vertical dividers to a more elaborate cabinet with multiple shallow drawers. Many designs prioritize simplicity and utilize basic woodworking techniques, making it an accessible project for most makers. The core principle remains consistent: dedicate a distinct, flat space for each grit size. This structured approach not only enhances efficiency but also extends the life of your sandpaper, making your abrasive inventory a valuable asset rather than a source of frustration.
Summary
The organized storage of sandpaper is a foundational element of an efficient workshop. By adopting a DIY flat file system, makers can overcome the common challenges of grit identification, material degradation, and workflow disruption. This practical approach not only streamlines operations but also reflects a professional commitment to tool care and project excellence. Investing a small amount of time into building a dedicated sandpaper storage solution yields significant returns in productivity and material longevity.
Resources
- Make: DIY Projects and Ideas for Makers - make.com
- Fine Woodworking - finewoodworking.com
- Woodworking for Mere Mortals - woodworkingformeremortals.com
Details
Author


Latest articles


 }})
You can now watch HBO Max for $10
In any well-equipped workshop, the humble sheet of sandpaper is an indispensable tool, yet its organization often remains an afterthought. The familiar scenario of rummaging through a crumpled pile of various grits, struggling to identify the correct abrasive, is a common frustration. This disarray not only wastes precious time but can also lead to premature wear of the sandpaper itself. The solution lies in a dedicated storage system designed for both accessibility and preservation: the DIY flat file for sandpaper.
The Imperative of Organized Abrasives
Effective workshop management hinges on efficient access to tools and materials. For sandpaper, this means keeping sheets flat, protected from dust and moisture, and—critically—separated by their respective grit sizes. A disorganized stash can lead to:
- Time Loss: Searching for the right grit disrupts workflow.
- Material Degradation: Creased or exposed sandpaper can lose its abrasive qualities faster.
- Project Delays: Inconsistent grit selection can compromise finish quality, leading to rework.
A purpose-built flat file system addresses these challenges directly, transforming a chaotic pile into an organized inventory.
Designing Your Grit Stash: The Flat File Approach
The concept of a flat file for sandpaper borrows from architectural and artistic storage solutions, where large, delicate documents are kept flat in shallow drawers or compartments. For sandpaper, this translates into a compact unit—often constructed from readily available materials like plywood, MDF, or even durable cardboard—that provides individual slots or shallow trays for each grit. The primary goal is to ensure each sheet remains perfectly flat, preventing the curling and bending that can degrade its efficacy.
Key Design Considerations:
- Material Durability: Plywood or MDF offers robustness and ease of construction, ensuring the unit withstands workshop conditions.
- Compartment Sizing: Design compartments slightly larger than standard sandpaper sheets (e.g., 9x11 inches or specific sizes for sanding discs) to allow for easy insertion and retrieval.
- Visibility and Labeling: Clear labeling for each grit (e.g., 60, 80, 120, 220, 320) is paramount. This can be achieved with adhesive labels, stencils, or even color-coding.
- Accessibility: Whether a series of pull-out trays, vertical dividers within an open box, or a flip-down front, the design should prioritize easy access without disturbing other grits.
- Dust Protection: A closed or semi-closed design helps protect sandpaper from abrasive dust, which can contaminate finer grits or clog the paper.
Implementing Your Storage Solution
Creating a DIY sandpaper flat file can range from a simple box with vertical dividers to a more elaborate cabinet with multiple shallow drawers. Many designs prioritize simplicity and utilize basic woodworking techniques, making it an accessible project for most makers. The core principle remains consistent: dedicate a distinct, flat space for each grit size. This structured approach not only enhances efficiency but also extends the life of your sandpaper, making your abrasive inventory a valuable asset rather than a source of frustration.
Summary
The organized storage of sandpaper is a foundational element of an efficient workshop. By adopting a DIY flat file system, makers can overcome the common challenges of grit identification, material degradation, and workflow disruption. This practical approach not only streamlines operations but also reflects a professional commitment to tool care and project excellence. Investing a small amount of time into building a dedicated sandpaper storage solution yields significant returns in productivity and material longevity.
Resources
- Make: DIY Projects and Ideas for Makers - make.com
- Fine Woodworking - finewoodworking.com
- Woodworking for Mere Mortals - woodworkingformeremortals.com
Latest articles
You can now watch HBO Max for $10
Similar posts


This is a page that only logged-in people can visit. Don't you feel special? Try clicking on a button below to do some things you can't do when you're logged out.
Example modal
At your leisure, please peruse this excerpt from a whale of a tale.
Chapter 1: Loomings.
Call me Ishmael. Some years ago—never mind how long precisely—having little or no money in my purse, and nothing particular to interest me on shore, I thought I would sail about a little and see the watery part of the world. It is a way I have of driving off the spleen and regulating the circulation. Whenever I find myself growing grim about the mouth; whenever it is a damp, drizzly November in my soul; whenever I find myself involuntarily pausing before coffin warehouses, and bringing up the rear of every funeral I meet; and especially whenever my hypos get such an upper hand of me, that it requires a strong moral principle to prevent me from deliberately stepping into the street, and methodically knocking people's hats off—then, I account it high time to get to sea as soon as I can. This is my substitute for pistol and ball. With a philosophical flourish Cato throws himself upon his sword; I quietly take to the ship. There is nothing surprising in this. If they but knew it, almost all men in their degree, some time or other, cherish very nearly the same feelings towards the ocean with me.
Comment